+9779814457421
info@websewa.online


In the ever-evolving landscape of web development, Progressive Web Apps (PWAs) have emerged as a game-changer, bridging the gap between traditional websites and native mobile applications. PWAs combine the best of both worlds: the reach and accessibility of the web with the performance and user experience of apps. If you're a developer looking to build fast, reliable, and engaging experiences, understanding PWAs is essential. In this article, we'll dive into what PWAs are, their key benefits, and provide a step-by-step guide to setting up a PWA using Next.js with its App Router, Tailwind CSS for styling, and TypeScript for type safety. Whether you're new to PWAs or refining your skills, this guide will equip you with the tools to create installable, offline-capable web apps. ## What Are Progressive Web Apps? Progressive Web Apps are web applications that leverage modern web technologies to deliver an app-like experience directly through the browser. Introduced by Google in 2015, PWAs use service workers, web app manifests, and other APIs to enable features like offline functionality, push notifications, and home screen installation. Unlike traditional websites, PWAs can run in fullscreen mode, work without an internet connection (by caching resources), and even integrate with device hardware. At their core, PWAs are built on three pillars: - **Reliable**: They load instantly and work offline or on flaky networks. - **Fast**: Optimized for performance with smooth animations and quick interactions. - **Engaging**: They feel like native apps, with features like add-to-home-screen prompts and background syncing. PWAs are "progressive" because they enhance progressively based on the user's device and browser capabilities. For instance, on a modern browser like Chrome or Edge, you'll get full PWA features, while older browsers fall back to a standard web experience. ## The Benefits of Building PWAs Why invest in PWAs? The advantages extend to both users and developers: - **Improved User Engagement**: PWAs can be installed on a user's home screen, leading to higher retention rates. Studies show that PWAs often see a 20-50% increase in engagement compared to mobile websites. - **Offline Capabilities**: By caching assets with service workers, PWAs function without internet access, making them ideal for travel apps, news readers, or e-commerce sites in areas with poor connectivity. - **Cost-Effective Development**: Build once and deploy everywhere—no need for separate iOS and Android apps. This reduces development time and maintenance costs. - **SEO and Discoverability**: PWAs are still web pages at heart, so they're indexable by search engines, driving organic traffic. - **Security**: Served over HTTPS, PWAs ensure data integrity and protect against tampering. - **Performance Boost**: Features like lazy loading and efficient caching result in faster load times, which can improve conversion rates by up to 20%, according to Google benchmarks. Real-world examples abound: Twitter (now X) Lite, Starbucks, and Pinterest have all adopted PWAs, reporting significant improvements in speed and user satisfaction. As web technologies advance, PWAs are becoming the go-to choice for modern web experiences. ## Setting Up a PWA with Next.js, Tailwind, and TypeScript Next.js is a powerful React framework that simplifies building server-rendered and static web apps. With its App Router (introduced in Next.js 13), you get enhanced routing, data fetching, and performance out of the box. Pairing it with Tailwind CSS for utility-first styling and TypeScript for robust typing creates a solid foundation for PWAs. We'll use the `next-pwa` library to handle service workers and offline support effortlessly. This setup ensures your app is future-proof, scalable, and ready for production. Follow these steps to get started. ### Step 1: Create a Next.js App Begin by bootstrapping your project with a modern setup. This command initializes a Next.js app using the App Router, TypeScript for type safety, and Tailwind CSS for rapid styling. It's a future-proof stack that handles routing, server-side rendering, and design consistency right from the start. Run the following in your terminal: ``` npx create-next-app@latest my-pwa-app --typescript --app --tailwind ``` Navigate into your project directory with `cd my-pwa-app`. This creates a clean boilerplate ready for PWA enhancements. ### Step 2: Install next-pwa To enable core PWA features like service workers for caching and offline support, install the `next-pwa` library. It integrates seamlessly with Next.js, requiring minimal configuration. Execute: ``` npm install next-pwa ``` This package will handle precaching your app's assets during the build process. ### Step 3: Configure next.config.js Next, update your Next.js configuration to wrap your app with PWA capabilities. This step registers the service worker, defines caching strategies, and disables it in development to avoid interference during local testing. Replace the contents of `next.config.js` with: ```javascript // next.config.js const withPWA = require("next-pwa")({ dest: "public", register: true, skipWaiting: true, disable: process.env.NODE_ENV === "development", }); module.exports = withPWA({ reactStrictMode: true, }); ``` Here, `dest: "public"` places the generated service worker files in the public directory. `skipWaiting: true` ensures the latest service worker activates immediately. ### Step 4: Add manifest.json & Icons The web app manifest is a JSON file that tells the browser how to treat your app when installed—like its name, icons, and theme colors. Create a `manifest.json` file in the `public` folder. Add this content: ```json // public/manifest.json { "name": "My PWA App", "short_name": "PWAApp", "start_url": "/", "display": "standalone", "theme_color": "#0f172a", "background_color": "#ffffff", "icons": [ { "src": "/icons/icon-192x192.png", "type": "image/png", "sizes": "192x192" }, { "src": "/icons/icon-512x512.png", "type": "image/png", "sizes": "512x512" } ] } ``` You'll also need to add the icons to `public/icons/`. You can generate these using tools like RealFaviconGenerator or create simple placeholders. The `"display": "standalone"` makes the app feel native by hiding browser UI. ### Step 5: Add Meta Tags To link your manifest and ensure compatibility across devices (like iOS), add relevant meta tags to your app's layout. This connects the manifest, sets theme colors, and provides touch icons. In `app/layout.tsx`, update the `<head>` section: ```tsx // app/layout.tsx <head> <link rel="manifest" href="/manifest.json" /> <link rel="apple-touch-icon" href="/icons/icon-192x192.png" /> <meta name="theme-color" content="#0f172a" /> </head> ``` These tags ensure your app's theme matches the manifest and supports installation on Apple devices. ### Step 6: Build & Test Finally, build your app for production to test PWA features like offline mode and installability. Development mode doesn't fully enable service workers, so a production build is crucial. Run: ``` npm run build npm start ``` Open your app in a browser (e.g., Chrome) at `http://localhost:3000`. Use Lighthouse in Chrome DevTools to audit for PWA compliance—it should flag your app as installable. Test offline by disabling your network; cached pages should still load. If everything checks out, you're ready to deploy! ## Best Practices and Next Steps Once set up, enhance your PWA with features like push notifications (using Web Push API) or background sync. Monitor performance with tools like Web Vitals, and deploy to platforms like Vercel for seamless hosting. PWAs represent the future of web development—reliable, engaging, and accessible. By following this guide with Next.js, Tailwind, and TypeScript, you've built a foundation for apps that rival native experiences. Experiment, iterate, and watch your user engagement soar. If you encounter issues, the Next.js and next-pwa documentation are excellent resources for deeper customization. Happy coding!

Are you searching for an affordable, reliable way to create a website or web application? Do you want a team of experts to handle everything from design to deployment while giving you full visibility into the process? Look no further than **webSewa**—a platform designed to simplify digital transformation for startups, businesses, organizations, professionals, freelancers, and anyone needing a sleek portfolio or blog. In this article, we’ll walk you through webSewa’s services, the technologies we use, our streamlined process, and how you can get started using the platform today. --- ## What is webSewa? webSewa is a comprehensive website development platform that delivers fast, scalable, and modern web solutions. Whether you’re launching an online store, a custom web app, or integrating AI into your platform, we’ve got you covered. Once you log in (via Google or GitHub), you gain access to a **customer dashboard** where you can manage: - **New Projects**: Start a project with ease. - **Projects**: Track your ongoing work. - **Notifications**: Stay updated on progress. - **Documents**: Access invoices, bills, and more. - **Support**: Reach out via WhatsApp, email, or direct messages. - **AI Assistant**: Get instant help with our chat feature. Our website, *websewa.online*, is user-friendly and packed with features. You’ll find an **AI chat assistant** and **WhatsApp messaging** floating icons in the lower right corner—available to everyone, even without logging in. Additional contact options (email, phone) are in the header, footer, and a dedicated contact page with a form. The navigation bar includes: - **Home**: An overview of what we do. - **Services**: Details on our offerings (more on this below). - **Blog**: Tech and web development insights. - **More**: Links to contact forms, about us, offers, and fun extras like "try coding" and "data visualizer." --- ## Our Core Services At webSewa, we offer four key services tailored to your needs: 1. **🌐 Website & E-Commerce Development** We craft responsive, SEO-friendly websites and online stores with seamless payment integration and modern designs that work flawlessly on all devices. 2. **🚀 Custom Web Applications** Need a tailored solution? We build full-stack web apps using MERN (MongoDB, Express.js, React, Node.js) or Next.js—scalable and optimized for your business workflows. 3. **🤖 AI Integration & Automation** Supercharge your platform with AI-powered chatbots, content generation, recommendation systems, and process automation. 4. **🔌 API & Ongoing Support** We develop robust APIs, integrate third-party services, and provide continuous support to keep your project running smoothly and securely. > *“We build fast, scalable, and modern websites & web apps using the latest technologies. Whether you’re a startup, an established business, or just need a personal blog, we simplify digital transformation for you.”* Explore these services further on our **Services** page, which includes links to: - *Start Your Project*: Request a quote. - *Our Process*: Learn how we work. - *Technologies*: See our tech stack. - *Demo Projects*: Check out our portfolio. - *FAQs*: Get answers to common questions. --- ## The Tech Behind webSewa We leverage cutting-edge tools to deliver top-notch results. Here’s a peek at our tech stack: ### Frontend - Next.js - React - Tailwind CSS - Shadcn/UI - TypeScript ### Backend - Node.js - Express - Django - PostgreSQL - MongoDB ### DevOps & Hosting - Vercel - AWS (EC2, S3, RDS, DynamoDB, Lambda) - GitHub Actions - Docker This powerful combination ensures your project is fast, secure, and scalable. --- ## How We Work: Our Process Working with webSewa is straightforward and transparent. Here’s our five-step process: 1. **Discovery & Consultation** We dive into your goals, audience, and technical needs. 2. **Planning & Proposal** We define the scope, timelines, and tech stack, delivering a clear roadmap. 3. **Design & Development** Using agile methods, we build and iterate while keeping you in the loop. 4. **Testing & Launch** After rigorous testing, we deploy your project on your preferred hosting. 5. **Ongoing Support** Post-launch, we offer updates, performance tuning, and feature additions. --- ## Frequently Asked Questions Here are some common questions we get: - **How long does a typical project take?** Simple websites take 2-4 weeks; complex apps may take 3-6 months. We’ll provide a timeline after consultation. - **Do you provide post-launch support?** Yes! We offer support packages from basic maintenance to full ongoing development. - **Can you work with my existing backend?** Absolutely. We’ll assess your setup and integrate seamlessly. - **How do you handle payments?** Payments are milestone-based (deposit, progress, final). We accept bank transfers and credit cards. - **What if I need changes during development?** Minor changes are included; larger ones may adjust timelines or budgets—we’ll discuss options first. --- ## How to Get Started with webSewa Ready to bring your idea to life? Here’s how to use the platform: 1. **Log In** Sign in with your Google or GitHub account at *webSewa.online*. Don’t have one? Create it for free. 2. **Access the Dashboard** Once logged in, you’ll land in the customer dashboard—your hub for managing projects and support. 3. **Start a New Project** Click “New Project,” fill out the form with details like project type, budget, and timeline, then submit. 4. **Review the Proposal** Within 24 hours, we’ll send a proposal and quote. Accept it, sign the contract, and pay the deposit to kick things off. 5. **Collaborate & Launch** Communicate with your assigned team via the dashboard, AI assistant, or WhatsApp. Track progress and provide feedback as we follow our process to launch your project. 6. **Enjoy Ongoing Support** After launch, we’ll keep your site or app running smoothly with tailored support. --- ## Why Choose webSewa? With our tagline, *“Smart Web Solutions Simplified,”* and footer promise, *“Building reliable websites, web apps & digital tools at affordable prices, with focus on simplicity and performance,”* webSewa stands out as your partner in digital success. Our platform, expert team, and robust tech stack make it easy to turn your vision into reality. Ready to get started? Log in to *websewa.online* today and let’s build something amazing together!

This guide walks you through deploying a Node.js Express API to Kubernetes using Minikube, with clear, beginner-friendly steps. By the end, you’ll have a containerized app running in Kubernetes, complete with health checks, configuration management, scaling, and monitoring with Prometheus and Grafana. --- ## 🧱 1. Basic App Setup Let’s start by setting up a simple Node.js Express API, containerizing it with Docker, and deploying it to a local Kubernetes cluster using Minikube. ### Step 1: Create a Node.js Express API Create a file named `server.js` for a basic Express API with health check endpoints. ```javascript const express = require('express'); const app = express(); const port = 3000; app.get('/', (req, res) => { const message = process.env.APP_MESSAGE || 'Hello, World!'; res.send(message); }); app.get('/healthz', (req, res) => { res.status(200).send('OK'); }); app.get('/readyz', (req, res) => { res.status(200).send('Ready'); }); app.listen(port, () => { console.log(`Server running on port ${port}`); }); ``` 1. Create a directory for your project: `mkdir node-api && cd node-api`. 2. Initialize a Node.js project: `npm init -y`. 3. Install Express: `npm install express`. 4. Save the above `server.js` code in the project directory. 5. Test locally: `node server.js` and visit `http://localhost:3000` in your browser. ### Step 2: Containerize the App with Docker Create a `Dockerfile` to build a Docker image for the app. ```dockerfile FROM node:18 WORKDIR /app COPY package*.json ./ RUN npm install COPY . . EXPOSE 3000 CMD ["node", "server.js"] ``` 1. Build the Docker image: `docker build -t node-api:1.0 .` 2. Test the image locally: `docker run -p 3000:3000 node-api:1.0`. 3. Push the image to a registry (e.g., Docker Hub) or load it into Minikube later. ### Step 3: Set Up Minikube Minikube creates a local Kubernetes cluster for testing. 1. Install Minikube: Follow instructions at [minikube.sigs.k8s.io](https://minikube.sigs.k8s.io/docs/start/). 2. Start Minikube: `minikube start`. 3. Load the Docker image into Minikube: `minikube image load node-api:1.0`. ### Step 4: Deploy to Kubernetes Create Kubernetes manifests to deploy the app. #### Deployment (node-api-deploy.yaml) This file defines the app’s deployment, including the container and health checks. ```yaml apiVersion: apps/v1 kind: Deployment metadata: name: node-api-deployment labels: app: node-api spec: replicas: 1 selector: matchLabels: app: node-api template: metadata: labels: app: node-api spec: containers: - name: node-api image: node-api:1.0 ports: - containerPort: 3000 ``` #### Service (node-api-service.yaml) This exposes the app within the cluster. ```yaml apiVersion: v1 kind: Service metadata: name: node-api-service spec: selector: app: node-api ports: - protocol: TCP port: 3000 targetPort: 3000 type: ClusterIP ``` 1. Apply the manifests: ```bash kubectl apply -f node-api-deploy.yaml kubectl apply -f node-api-service.yaml ``` 2. Verify the deployment: `kubectl get pods` and `kubectl get services`. 3. Access the app: `kubectl port-forward service/node-api-service 8080:3000`. 4. Open `http://localhost:8080` in your browser to see the app running. --- ## ⚙️ 2. Adding Health Checks Health checks ensure Kubernetes knows if your app is running correctly (`livenessProbe`) or ready to serve traffic (`readinessProbe`). Update the `node-api-deploy.yaml` to include probes: ```yaml apiVersion: apps/v1 kind: Deployment metadata: name: node-api-deployment labels: app: node-api spec: replicas: 1 selector: matchLabels: app: node-api template: metadata: labels: app: node-api spec: containers: - name: node-api image: node-api:1.0 ports: - containerPort: 3000 livenessProbe: httpGet: path: /healthz port: 3000 initialDelaySeconds: 5 periodSeconds: 10 readinessProbe: httpGet: path: /readyz port: 3000 initialDelaySeconds: 5 periodSeconds: 5 ``` 1. Apply the updated deployment: `kubectl apply -f node-api-deploy.yaml`. 2. Verify probes: `kubectl describe pod <pod-name>` to check probe status. --- ## 🔐 3. ConfigMaps & Secrets Use ConfigMaps for non-sensitive configuration and Secrets for sensitive data. ### Step 1: Create a ConfigMap Create `node-api-config.yaml` for the app’s message. ```yaml apiVersion: v1 kind: ConfigMap metadata: name: node-api-config data: APP_MESSAGE: "Hello from ConfigMap!" ``` ### Step 2: Create a Secret Create `node-api-secret.yaml` for a secret key. ```yaml apiVersion: v1 kind: Secret metadata: name: node-api-secret type: Opaque data: SECRET_KEY: bXJTZWNyZXRWYWx1ZQ== # base64 encoded "mySecretValue" ``` 1. Apply both: ```bash kubectl apply -f node-api-config.yaml kubectl apply -f node-api-secret.yaml ``` ### Step 3: Use ConfigMap and Secret in Deployment Update `node-api-deploy.yaml` to inject these into the container. ```yaml apiVersion: apps/v1 kind: Deployment metadata: name: node-api-deployment labels: app: node-api spec: replicas: 1 selector: matchLabels: app: node-api template: metadata: labels: app: node-api spec: containers: - name: node-api image: node-api:1.0 ports: - containerPort: 3000 livenessProbe: httpGet: path: /healthz port: 3000 initialDelaySeconds: 5 periodSeconds: 10 readinessProbe: httpGet: path: /readyz port: 3000 initialDelaySeconds: 5 periodSeconds: 5 env: - name: APP_MESSAGE valueFrom: configMapKeyRef: name: node-api-config key: APP_MESSAGE - name: SECRET_KEY valueFrom: secretKeyRef: name: node-api-secret key: SECRET_KEY ``` 1. Apply the updated deployment: `kubectl apply -f node-api-deploy.yaml`. 2. Verify: Access `http://localhost:8080` (after port-forwarding) to see the ConfigMap message. --- ## 📈 4. Scaling & Rolling Updates Kubernetes makes scaling and updating apps easy. ### Step 1: Scale the App Increase the number of replicas: ```bash kubectl scale deployment node-api-deployment --replicas=3 ``` Verify: `kubectl get pods` to see three pods running. ### Step 2: Perform a Rolling Update Update the app to a new image version (e.g., `node-api:1.1`): ```bash kubectl set image deployment/node-api-deployment node-api=node-api:1.1 ``` Verify: `kubectl rollout status deployment/node-api-deployment` to ensure no downtime. --- ## 📊 5. Metrics & Monitoring Monitor resource usage with Kubernetes Metrics Server, Prometheus, and Grafana. ### Step 1: Install Metrics Server 1. Install Metrics Server: ```bash kubectl apply -f https://github.com/kubernetes-sigs/metrics-server/releases/latest/download/components.yaml ``` 2. Verify: `kubectl top nodes` and `kubectl top pods` to see resource usage. ### Step 2: Install Prometheus 1. Add the Prometheus Helm repository: ```bash helm repo add prometheus-community https://prometheus-community.github.io/helm-charts helm repo update ``` 2. Install Prometheus in the `prometheus` namespace: ```bash kubectl create namespace prometheus helm install prometheus prometheus-community/prometheus --namespace prometheus ``` 3. Access Prometheus UI: `kubectl -n prometheus port-forward svc/prometheus-server 9090`. 4. Open `http://localhost:9090` in your browser. ### Step 3: Install Grafana 1. Install Grafana via Helm: ```bash helm repo add grafana https://grafana.github.io/helm-charts helm repo update helm install grafana grafana/grafana --namespace prometheus ``` 2. Access Grafana: `kubectl -n prometheus port-forward svc/grafana 3000:80`. 3. Open `http://localhost:3000` and log in with default credentials (`admin/admin`). --- ## 📊 6. Visualizing Metrics in Grafana Visualize your cluster’s metrics in Grafana. 1. Log into Grafana (`http://localhost:3000`). 2. Add a Prometheus data source: - URL: `http://prometheus-server.prometheus.svc.cluster.local:80`. 3. Import dashboards: - **Node Exporter Full** (ID: 18603). - **Kubernetes Pods** (ID: 6588). 4. View real-time CPU and memory usage for nodes and pods. --- ## ✅ Project Status: Complete & Monitored Congratulations! Your Node.js app is now: - **Containerized** with Docker 🐳 - **Running in Kubernetes** with Minikube ☸️ - **Health-monitored** with liveness and readiness probes ✔️ - **Configurable** via ConfigMaps and Secrets 🔐 - **Scalable** and updatable with rolling updates 🔄 - **Observed** with Prometheus and Grafana 📈 This setup is a solid foundation for deploying Node.js apps to Kubernetes. Experiment further by adding more features or deploying to a cloud provider!

Kubernetes is a powerful tool for managing applications, and Minikube makes it easy to try it out locally. In this beginner-friendly guide, we’ll walk through deploying a simple Node.js API to Kubernetes using Minikube. By the end, you’ll have a running API that says "Hello from Kubernetes!" Let’s dive in! ## What You’ll Need - **Node.js**: Installed on your computer (version 18 or later recommended). - **Docker**: To build and manage container images. - **Minikube**: A tool to run Kubernetes locally. - **kubectl**: The Kubernetes command-line tool to interact with your cluster. - A code editor (like VS Code) and a terminal. Don’t worry if these terms sound new—we’ll explain each step clearly! --- ## Step 1: Create Your Node.js App First, let’s build a simple Node.js API using the Express framework. 1. **Create a project folder** called `node-api` and navigate to it in your terminal: ```bash mkdir node-api cd node-api ``` 2. **Initialize a Node.js project**: ```bash npm init -y ``` 3. **Install Express**: ```bash npm install express ``` 4. **Create the server code** in a file named `server.js`: ```javascript const express = require('express'); const app = express(); const port = 3000; app.get('/', (req, res) => { res.send('Hello from Kubernetes!'); }); app.listen(port, () => { console.log(`Listening on port ${port}`); }); ``` 5. **Update `package.json`** to include the start script and Express dependency: ```json { "name": "node-api", "version": "1.0.0", "main": "server.js", "scripts": { "start": "node server.js" }, "dependencies": { "express": "^4.18.2" } } ``` 6. **Test your app locally**: ```bash npm start ``` Open `http://localhost:3000` in your browser. You should see "Hello from Kubernetes!" If it works, you’re ready for the next step! --- ## Step 2: Create a Dockerfile To run our app in Kubernetes, we need to package it into a Docker container. A Dockerfile defines how to build this container. 1. **Create a file named `Dockerfile`** in your `node-api` folder: ```dockerfile FROM node:18 WORKDIR /app COPY . . RUN npm install CMD ["npm", "start"] ``` **What’s happening here?** - `FROM node:18`: Uses the official Node.js 18 image as the base. - `WORKDIR /app`: Sets the working directory inside the container. - `COPY . .`: Copies your project files into the container. - `RUN npm install`: Installs dependencies. - `CMD ["npm", "start"]`: Runs the app when the container starts. --- ## Step 3: Build the Docker Image Now, let’s build the Docker image for our app. 1. **Run the build command** in your terminal (make sure you’re in the `node-api` folder): ```bash docker build -t node-api:1.0 . ``` **What’s this doing?** - `docker build`: Creates a Docker image from the Dockerfile. - `-t node-api:1.0`: Tags the image with the name `node-api` and version `1.0`. - `.`: Tells Docker to use the Dockerfile in the current directory. You can check if the image was created by running: ```bash docker images ``` --- ## Step 4: Load the Image into Minikube Minikube runs a local Kubernetes cluster, and we need to make our Docker image available to it. 1. **Ensure Minikube is running**: ```bash minikube start ``` 2. **Load the Docker image into Minikube**: ```bash minikube image load node-api:1.0 ``` This transfers the `node-api:1.0` image to Minikube’s internal Docker registry. --- ## Step 5: Create a Kubernetes Deployment A Kubernetes Deployment ensures our app runs reliably. We’ll define it in a YAML file. 1. **Create a file named `node-api-deploy.yaml`**: ```yaml apiVersion: apps/v1 kind: Deployment metadata: name: node-api-deploy spec: replicas: 1 selector: matchLabels: app: node-api template: metadata: labels: app: node-api spec: containers: - name: node-api image: node-api:1.0 ports: - containerPort: 3000 ``` **What’s in this file?** - `kind: Deployment`: Defines a Kubernetes Deployment. - `metadata.name`: Names the deployment `node-api-deploy`. - `replicas: 1`: Runs one instance (pod) of the app. - `selector` and `labels`: Links the deployment to pods with the label `app: node-api`. - `containers`: Specifies the Docker image (`node-api:1.0`) and the port (`3000`). 2. **Apply the deployment**: ```bash kubectl apply -f node-api-deploy.yaml ``` 3. **Verify the deployment**: ```bash kubectl get deployments ``` You should see `node-api-deploy` listed. --- ## Step 6: Expose the Deployment with a Service To access the app, we need a Kubernetes Service to expose it. 1. **Create a file named `node-api-service.yaml`**: ```yaml apiVersion: v1 kind: Service metadata: name: node-api-service spec: type: NodePort selector: app: node-api ports: - port: 3000 targetPort: 3000 nodePort: 30036 ``` **What’s happening here?** - `kind: Service`: Defines a Kubernetes Service. - `type: NodePort`: Exposes the app on a specific port. - `selector`: Connects the service to pods with the label `app: node-api`. - `ports`: Maps port `3000` in the service to port `3000` in the container, and exposes it externally on port `30036`. 2. **Apply the service**: ```bash kubectl apply -f node-api-service.yaml ``` 3. **Verify the service**: ```bash kubectl get services ``` --- ## Step 7: Access Your App Finally, let’s make the app accessible from your browser. 1. **Set up port forwarding**: ```bash kubectl port-forward service/node-api-service 8080:3000 ``` This maps port `8080` on your local machine to port `3000` on the Kubernetes service. 2. **Open your browser** and visit: ``` http://localhost:8080 ``` You should see: ``` Hello from Kubernetes! ``` --- ## Congratulations! 🎉 You’ve successfully deployed a Node.js API to Kubernetes using Minikube! You created a simple app, containerized it with Docker, and used Kubernetes to manage and expose it. From here, you can explore scaling your app, adding more routes, or deploying to a cloud provider. **Cleanup (Optional)**: To stop Minikube and free up resources: ```bash minikube stop minikube delete ``` Happy coding, and welcome to the world of Kubernetes! 🚀

Welcome to the world of Kubernetes! If you’re new to container orchestration, Kubernetes (often abbreviated as K8s) is a powerful tool that automates the deployment, scaling, and management of containerized applications. But before diving into Kubernetes, it’s helpful to understand the basics of Docker and containers, as Kubernetes relies heavily on them. This beginner-friendly guide will walk you through setting up Kubernetes locally on Windows using the Windows Subsystem for Linux (WSL2). We’ll start with a quick recap of Docker and containers to ensure you’re ready, then provide clear, step-by-step instructions to install and run Kubernetes with Minikube. --- ## 🐳 Docker and Containers: A Quick Recap ### What Is Docker? Docker is a platform that lets you package and run applications in **containers**. It simplifies the process of building, shipping, and running applications across different environments. ### What’s a Container? A **container** is a lightweight, standalone, and executable package that includes everything needed to run a piece of software: - Code - Runtime - System tools - Libraries - Settings Containers are isolated from each other but share the same operating system (OS) kernel, making them much more efficient than traditional virtual machines (VMs). **Analogy**: Think of containers as lightweight virtual machines. They’re faster, smaller, and use fewer resources because they don’t need a full OS for each instance. ### Containers vs. Virtual Machines Here’s a quick comparison to clarify the difference: | **Feature** | **Containers** | **Virtual Machines** | |-----------------------|------------------------------------|------------------------------------| | **Startup Time** | Seconds | Minutes | | **Resource Usage** | Low (shares host kernel) | High (requires full OS) | | **OS Requirements** | Shares host OS kernel | Needs a full OS per VM | | **Isolation Level** | Process-level | Full OS-level | ### Basic Docker Workflow To understand how Docker works, here’s a simple example of creating and running a containerized Node.js application: 1. **Create a Dockerfile**: A text file with instructions to build a container image. ```dockerfile FROM node:18 WORKDIR /app COPY . . RUN npm install CMD ["node", "app.js"] ``` 2. **Build the Image**: Use the Dockerfile to create an image. ```bash docker build -t my-node-app . ``` 3. **Run the Container**: Start a container from the image. ```bash docker run -d -p 3000:3000 my-node-app ``` ### Why Containers Matter for Kubernetes Kubernetes doesn’t run your applications directly—it manages your **containers**. It handles tasks like: - Starting containers - Restarting them if they crash - Scaling them up or down - Exposing them via networking With a basic understanding of Docker and containers, you’re ready to let Kubernetes orchestrate them in a smart, automated way! --- ## ✅ Step-by-Step: Setting Up Kubernetes with Minikube on Windows (Using WSL2) In this section, we’ll install and configure Kubernetes locally using **Minikube**, a tool that runs a single-node Kubernetes cluster on your machine. We’ll use **WSL2** (Windows Subsystem for Linux) as the environment and **kubectl**, the Kubernetes command-line tool, to interact with the cluster. ### 🔧 Step 1: Prerequisites Before starting, ensure you have the following: - **WSL2** installed and set as the default version. - An Ubuntu or Debian distribution running in WSL2. - **Virtualization enabled** in your BIOS (required for running virtual machines). - **Windows Terminal** or **PowerShell** installed for easy access to WSL. To verify WSL2 is set up correctly, run this command in PowerShell or Windows Terminal: ```bash wsl -l -v ``` Look for your distro (e.g., Ubuntu) and ensure it shows **VERSION 2**. If it’s version 1 or not installed, update WSL2 by following Microsoft’s official guide: [Install WSL](https://learn.microsoft.com/en-us/windows/wsl/install). ### 🔄 Step 2: Install kubectl in WSL2 **kubectl** is the command-line tool for interacting with Kubernetes clusters. To install it in your WSL2 Ubuntu/Debian terminal: 1. Download the latest stable version of kubectl: ```bash curl -LO "https://dl.k8s.io/release/$(curl -Ls https://dl.k8s.io/release/stable.txt)/bin/linux/amd64/kubectl" ``` 2. Make it executable: ```bash chmod +x kubectl ``` 3. Move it to a system-wide location: ```bash sudo mv kubectl /usr/local/bin/ ``` 4. Verify the installation: ```bash kubectl version --client ``` You should see the kubectl client version (e.g., `v1.28.0`). ### 📦 Step 3: Install Minikube in WSL2 **Minikube** runs a local Kubernetes cluster. To install it in WSL2: 1. Download the latest Minikube binary: ```bash curl -LO https://storage.googleapis.com/minikube/releases/latest/minikube-linux-amd64 ``` 2. Install it to a system-wide location: ```bash sudo install minikube-linux-amd64 /usr/local/bin/minikube ``` 3. Verify the installation: ```bash minikube version ``` You should see the Minikube version (e.g., `minikube version: v1.32.0`). ### ⚙️ Step 4: Start Minikube with the Docker Driver Minikube supports several drivers, but the **Docker driver** is recommended for WSL2 because it integrates well with Docker Desktop on Windows. #### Option A: If Docker Desktop Is Already Installed If you have **Docker Desktop** installed on Windows with WSL2 integration enabled: 1. Start Minikube: ```bash minikube start --driver=docker ``` This uses the Docker daemon from Docker Desktop (via WSL2 integration). #### Option B: If Docker Is Not Installed If you don’t have Docker Desktop installed: 1. Download and install **Docker Desktop** from [Docker’s official site](https://www.docker.com/products/docker-desktop/). 2. During setup, enable WSL2 integration in Docker Desktop’s settings (Settings > Resources > WSL Integration > Enable integration with your WSL distro). 3. Restart your WSL terminal and run: ```bash minikube start --driver=docker ``` #### Verify Minikube Is Running Check if the Kubernetes cluster is up: ```bash kubectl get nodes ``` You should see a node named `minikube` in the **Ready** state, like this: ``` NAME STATUS ROLES AGE VERSION minikube Ready control-plane 2m v1.28.0 ``` --- ## 🚀 Running Your First Pod (Nginx) Now that your Kubernetes cluster is running, let’s deploy a simple **Nginx** pod—a small containerized web server. ### Step 1: Create an Nginx Pod Run this command in your WSL2 terminal: ```bash kubectl run nginx-pod --image=nginx --restart=Never ``` This command tells Kubernetes to: - Create a pod named `nginx-pod`. - Use the `nginx` image from Docker Hub. - Run it as a single pod (`--restart=Never` ensures it’s not managed by a Deployment or ReplicaSet). ### Step 2: Check Pod Status Verify the pod is running: ```bash kubectl get pods ``` You should see output like: ``` NAME READY STATUS RESTARTS AGE nginx-pod 1/1 Running 0 10s ``` If the pod is stuck in `ContainerCreating` or `ImagePullBackOff`, it may be pulling the image or facing network issues. Wait a few seconds and check again, or troubleshoot by running: ```bash kubectl describe pod nginx-pod ``` ### Step 3: See Pod Details To get more information about the pod (e.g., events, IP, or image details): ```bash kubectl describe pod nginx-pod ``` This displays detailed logs, which can help with debugging if needed. ### Step 4: Access the Nginx Web Server Pods are isolated by default, so we’ll use **port forwarding** to access the Nginx web server from your local machine. Run this command: ```bash kubectl port-forward pod/nginx-pod 8080:80 ``` You’ll see output like: ``` Forwarding from 127.0.0.1:8080 -> 80 ``` This maps port `8080` on your local machine to port `80` (Nginx’s default port) in the pod. Now, open your browser and go to: ``` http://localhost:8080 ``` You should see the Nginx welcome page, confirming your pod is running successfully! 🎉 --- ## What’s Next? You’ve just set up a local Kubernetes cluster using Minikube on WSL2 and deployed your first Nginx pod! From here, you can explore: - **Deployments**: For managing multiple pod replicas. - **Services**: For exposing pods to external traffic. - **ConfigMaps and Secrets**: For managing configuration and sensitive data. - **Scaling**: To handle more traffic by adding pod replicas. If you run into issues, use `kubectl describe` or `kubectl logs` to troubleshoot, or feel free to ask for help!
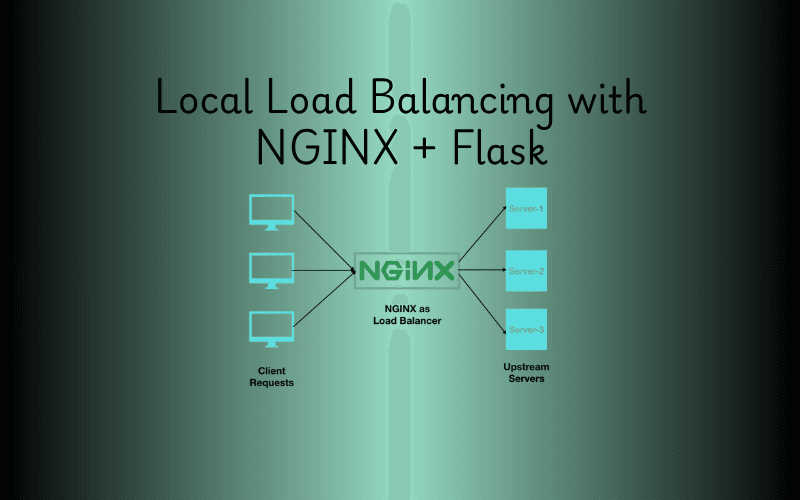
Imagine you’re running a busy website, and suddenly, traffic spikes. One server can’t handle it all—requests slow down, and users get frustrated. That’s where a **load balancer** comes in, distributing traffic across multiple servers to keep things running smoothly. In this guide, we’ll set up a simple local load balancer using **NGINX** and two **Flask** applications on **WSL (Windows Subsystem for Linux)**. It’s a fantastic way to learn load balancing hands-on, right on your own machine! **Context** - **NGINX**: A high-performance web server that doubles as a reverse proxy and load balancer. It’s widely used for its speed and ability to manage traffic efficiently. - **Flask**: A minimalist Python web framework perfect for building lightweight web apps or APIs. - **WSL**: A feature of Windows that lets you run a Linux environment (like Ubuntu) without a separate machine or virtual machine, making it ideal for development. By combining these tools, you’ll create a mini load-balanced system where NGINX directs traffic between two Flask servers. Let’s dive in! --- ## 🧰 Prerequisites Before starting, ensure you have: - **WSL installed** (Ubuntu recommended) - **Python 3** - **Internet connection** (for package downloads) - **Basic Linux command knowledge** --- ## 📋 Step-by-Step Guide ### ✅ Step 1: Set Up Project Folder Start by creating a folder to keep your project organized. ```bash mkdir nginx-loadb-demo cd nginx-loadb-demo ``` - **Why?**: A dedicated folder keeps your files tidy and easy to manage. ### ✅ Step 2: Create a Python Virtual Environment Set up a virtual environment to isolate your project’s Python dependencies. ```bash sudo apt update sudo apt install python3-venv python3 -m venv venv source venv/bin/activate ``` - **Explanation**: - `sudo apt update`: Refreshes your package list. - `sudo apt install python3-venv`: Installs the tool to create virtual environments. - `python3 -m venv venv`: Creates a virtual environment named `venv`. - `source venv/bin/activate`: Activates it, so your commands use this environment’s packages. ### ✅ Step 3: Install Flask Install Flask, the framework for your backend servers. ```bash pip install flask ``` - **Why?**: Flask lets you quickly build the web servers NGINX will balance. ### ✅ Step 4: Create Two Flask Backend Servers Create two simple Flask apps to act as your backend servers. - **app1.py** ```python from flask import Flask app = Flask(__name__) @app.route('/') def home(): return "Response from Server 1" if __name__ == '__main__': app.run(host="0.0.0.0", port=5001) ``` - **app2.py** ```python from flask import Flask app = Flask(__name__) @app.route('/') def home(): return "Response from Server 2" if __name__ == '__main__': app.run(host="0.0.0.0", port=5002) ``` - **Explanation**: - Each app responds with a unique message at the root URL (`/`). - They run on different ports (`5001` and `5002`) to simulate separate servers. ### ✅ Step 5: Run the Flask Servers Launch each Flask app in its own terminal so they run simultaneously. - **Terminal 1** ```bash source venv/bin/activate python app1.py ``` - **Terminal 2** ```bash source venv/bin/activate python app2.py ``` - **Why?**: Running them separately ensures both servers are available for NGINX to balance. ### ✅ Step 6: Install and Configure NGINX NGINX will distribute traffic between your Flask servers. - **Install NGINX** ```bash sudo apt install nginx ``` - **Edit the NGINX Config** ```bash sudo nano /etc/nginx/nginx.conf ``` Replace its contents with: ```nginx events {} http { upstream flask_backend { server 127.0.0.1:5001; server 127.0.0.1:5002; } server { listen 8080; location / { proxy_pass http://flask_backend; } } } ``` - **Save and Exit**: Press `CTRL + O`, `ENTER`, then `CTRL + X`. - **Explanation**: - `upstream flask_backend`: Groups your Flask servers for load balancing. - `server`: Sets NGINX to listen on port `8080` and forward requests to the `flask_backend` group. ### ✅ Step 7: Restart or Reload NGINX Apply your configuration changes. - If NGINX is running: ```bash sudo nginx -s reload ``` - If NGINX isn’t running: ```bash sudo nginx ``` - **Why?**: Reloading updates NGINX without downtime; starting it kicks things off if it’s stopped. ### ✅ Step 8: Test the Load Balancer Test your setup by sending requests to NGINX. ```bash curl http://localhost:8080 ``` Run it multiple times. Expected output alternates: ``` Response from Server 1 Response from Server 2 Response from Server 1 ... ``` - **Explanation**: NGINX uses a round-robin method to alternate between servers, proving your load balancer works! --- ## 🎉 Conclusion You’ve done it! You’ve built a local load balancer with NGINX and Flask on WSL, distributing traffic between two backend servers. This setup is a great foundation for understanding how load balancing works in real-world applications. Play around with it—tweak settings, add servers, or try the optional steps below! --- ## 🧪 Optional Next Steps Take your setup further with these ideas: - **🔁 Use `least_conn` method**: Balances load based on the fewest active connections. - **🔍 Add health checks**: Ensures NGINX only uses healthy servers. - **📌 Enable sticky sessions (IP hash)**: Keeps a client tied to one server. - **🐳 Containerize with Docker**: Simplifies scaling and deployment. Enjoy experimenting with your new load balancer!

Developing full-stack applications often involves running both backend and frontend projects simultaneously. For developers using Windows Subsystem for Linux (WSL), managing these processes efficiently can be a challenge, especially when you want your apps to start automatically and run reliably in the background. In this article, we'll walk through setting up a Django backend and a React frontend (built with Vite) to run as background services using systemd on WSL. This setup ensures your applications launch on system startup and stay running without manual intervention — making your development environment more seamless and production-like. Whether you’re building APIs with Django or modern UIs with React, this guide will help you automate your workflow and better manage your full-stack projects on WSL. --- ## 1. Understanding the Need for systemd Services on WSL ### Why manage your apps with systemd? Systemd is a system and service manager for Linux systems. It allows you to manage processes (like your Django and React apps) as services, which means they can start automatically when your system boots and restart if they crash. This is particularly useful in a development environment where you want your applications to be always available without manually starting them each time. ### Benefits of running Django and React as services - **Automation**: Services start automatically on system startup. - **Reliability**: Systemd can restart your services if they fail. - **Background operation**: Your apps run in the background, freeing up your terminal for other tasks. - **Production-like environment**: Mimics how applications are managed in production, making it easier to transition from development to deployment. --- ## 2. Preparing Your Environment Before setting up the services, ensure your WSL environment is ready. ### Installing Python venv and Node.js tools on WSL 1. Update your package list: ```bash sudo apt update ``` 2. Install Python virtual environment tools: ```bash sudo apt install python3-venv ``` 3. Install Node.js and npm (if not already installed): ```bash sudo apt install nodejs npm ``` ### Organizing project directories For this guide, we'll assume your projects are organized as follows: - Django backend: `~/projects/drf-blog` - React frontend: `~/projects/drf-blog-frontend` Make sure your projects are placed in these directories or adjust the paths accordingly in the steps below. --- ## 3. Setting Up the Django Backend Service ### Creating and activating a virtual environment 1. Create a virtual environment for Django: ```bash python3 -m venv ~/.venvs/django ``` 2. Activate the virtual environment: ```bash source ~/.venvs/django/bin/activate ``` ### Installing dependencies 1. Navigate to your Django project directory: ```bash cd ~/projects/drf-blog ``` 2. Install the required dependencies: ```bash pip install -r requirements.txt # or manually install django gunicorn ``` ### Testing Gunicorn manually Before setting up the service, test Gunicorn to ensure your Django app runs correctly: ```bash gunicorn blog_backend.wsgi:application --bind 0.0.0.0:8000 ``` If successful, you should see output indicating the server is running. Stop the server with `Ctrl+C` after testing. ### Creating a systemd service file for Django 1. Create a new service file: ```bash sudo nano /etc/systemd/system/django.service ``` 2. Paste the following configuration: ```ini [Unit] Description=Django Application After=network.target [Service] User=<WSL username> Group=<WSL username> WorkingDirectory=/home/<WSL username>/projects/drf-blog ExecStart=/home/<WSL username>/.venvs/django/bin/gunicorn blog_backend.wsgi:application --bind 0.0.0.0:8000 Restart=always [Install] WantedBy=multi-user.target ``` ### Starting and enabling the Django service 1. Reload systemd to recognize the new service: ```bash sudo systemctl daemon-reexec sudo systemctl daemon-reload ``` 2. Enable the service to start on boot: ```bash sudo systemctl enable django.service ``` 3. Start the service: ```bash sudo systemctl start django.service ``` 4. Check the service status: ```bash sudo systemctl status django.service ``` You should see the service is active and running. --- ## 4. Setting Up the React Frontend Service with Vite Preview ### Installing npm dependencies 1. Navigate to your React project directory: ```bash cd ~/projects/drf-blog-frontend ``` 2. Install the required dependencies: ```bash npm install ``` ### Building the React app Build your React app for production: ```bash npm run build ``` ### Running Vite preview manually to verify 1. Update your `package.json` to allow Vite preview to bind to all interfaces: ```json "scripts": { "preview": "vite preview --host" } ``` 2. Test the preview manually: ```bash npm run preview ``` You should see output like: ``` ➜ Local: http://localhost:4173/ ➜ Network: http://<your-ip>:4173/ ``` Stop the preview with `Ctrl+C` after verifying. ### Creating a systemd service file for the React app 1. Create a new service file: ```bash sudo nano /etc/systemd/system/react.service ``` 2. Paste the following configuration: ```ini [Unit] Description=React App Production Preview After=network.target [Service] User=<WSL username> Group=<WSL username> WorkingDirectory=/home/<WSL username>/projects/drf-blog-frontend ExecStart=/usr/bin/npm run preview Restart=always Environment=NODE_ENV=production Environment=PATH=/usr/bin:/usr/local/bin [Install] WantedBy=multi-user.target ``` ### Enabling and starting the React service 1. Reload systemd to recognize the new service: ```bash sudo systemctl daemon-reexec sudo systemctl daemon-reload ``` 2. Enable the service to start on boot: ```bash sudo systemctl enable react.service ``` 3. Start the service: ```bash sudo systemctl start react.service ``` 4. Check the service status: ```bash sudo systemctl status react.service ``` Ensure the service is active and running. --- ## 5. Testing and Verifying Both Services ### Checking open ports 1. Verify the Django backend is listening on port 8000: ```bash ss -tuln | grep 8000 ``` 2. Verify the React frontend is listening on port 4173: ```bash ss -tuln | grep 4173 ``` ### Accessing apps via browser 1. Access the Django backend: - Open your browser and go to `http://localhost:8000` or `http://<your-wsl-ip>:8000`. 2. Access the React frontend: - Open your browser and go to `http://localhost:4173` or `http://<your-wsl-ip>:4173`. ### Debugging common issues - **Service not starting**: Check the service logs with `sudo journalctl -u <service-name>`. - **Port conflicts**: Ensure no other processes are using ports 8000 and 4173. - **Permission issues**: Verify that the user specified in the service files has access to the project directories. --- ## 6. Next Steps and Best Practices - **Serving React with Nginx for production**: For a production environment, consider serving your React app with a web server like Nginx for better performance and security. - **Proxying frontend and backend under one domain**: Use a reverse proxy (e.g., Nginx) to serve both the frontend and backend under a single domain, simplifying API calls and improving user experience. - **Automating with Docker (optional)**: Docker can further streamline your development and deployment process by containerizing your applications, making them easier to manage and deploy. --- By following these steps, you’ve successfully set up your Django backend and React frontend to run as background services on WSL using systemd. This setup not only automates your development workflow but also provides a more reliable and production-like environment for your full-stack projects.

Cloud computing has transformed how businesses and individuals access computing resources, offering on-demand services like servers, storage, databases, and analytics over the Internet. This model, often referred to as "the cloud," enables faster innovation, flexible resource allocation, and cost savings by eliminating the need for physical hardware management. According to industry insights, cloud computing allows organizations to scale operations efficiently while reducing upfront costs (AWS What is Cloud Computing?). Amazon Web Services (AWS), launched by Amazon in 2006, is the world’s most comprehensive and widely adopted cloud platform. It offers over 200 fully featured services from data centers across the globe, serving millions of customers, including startups, large enterprises, and government agencies. AWS provides a mix of infrastructure as a service (IaaS), platform as a service (PaaS), and software as a service (SaaS), enabling users to lower costs, increase agility, and innovate rapidly (AWS What is AWS?). Its pay-as-you-go pricing model and extensive service offerings make it a cornerstone of modern digital infrastructure. ## Core Categories of AWS Services AWS organizes its services into several core categories: compute, storage, database, networking, and security. Each category addresses specific needs, from running applications to securing data, and is supported by real-world use cases across industries. ### 1. Compute Services Compute services provide the processing power needed to run applications. AWS offers several tools in this category: - **Elastic Compute Cloud (EC2)**: EC2 allows users to rent virtual servers, known as instances, to run applications. It supports various operating systems and configurations, offering scalable computing capacity. - **Lambda**: A serverless computing service that runs code without provisioning servers, automatically scaling based on demand. - **Elastic Container Service (ECS) and Elastic Kubernetes Service (EKS)**: These services manage containerized applications, with ECS supporting Docker and EKS handling Kubernetes. *Real-World Use Case*: Netflix leverages EC2 to manage the massive scale of its streaming platform, dynamically adjusting computing resources to handle millions of viewers worldwide (AWS Use Cases). This scalability ensures uninterrupted streaming during peak usage. ### 2. Storage Services AWS provides robust storage solutions for various data needs: - **Simple Storage Service (S3)**: S3 is an object storage service known for its scalability, availability, and security. It is ideal for storing and retrieving data, such as media files or backups. - **Elastic Block Store (EBS)**: EBS offers block-level storage volumes for EC2 instances, functioning like network-attached hard drives. - **Elastic File System (EFS)**: EFS provides a scalable file storage system for EC2 instances, supporting both Linux and Windows environments. *Real-World Use Case*: Adobe uses S3 to store and serve creative assets, ensuring high availability and durability for its global user base (Intellipaat AWS Use Cases). ### 3. Database Services AWS offers managed database services for both relational and NoSQL needs: - **Relational Database Service (RDS)**: RDS simplifies the setup, operation, and scaling of relational databases, supporting engines like MySQL, PostgreSQL, Oracle, and SQL Server. - **DynamoDB**: A NoSQL database service designed for low-latency, high-scale applications. - **Redshift**: A managed data warehouse service for large-scale analytics. *Real-World Use Case*: Bankinter, a financial institution, uses RDS to manage its relational databases, ensuring high performance and scalability for banking applications (Intellipaat AWS Use Cases). ### 4. Networking Services Networking services ensure secure and efficient connectivity: - **Virtual Private Cloud (VPC)**: VPC allows users to create isolated virtual networks, mimicking traditional data center networks with enhanced scalability. - **Route 53**: A scalable DNS service for routing traffic to AWS resources or external domains. - **Direct Connect**: Provides dedicated network connections to AWS, bypassing the public Internet for improved performance. *Real-World Use Case*: Samsung utilizes VPC to create secure, isolated networks for its applications, ensuring performance and compliance across its global operations (Intellipaat AWS Use Cases). ### 5. Security Services Security is a critical focus for AWS, with services designed to protect data and manage access: - **Identity and Access Management (IAM)**: IAM enables secure control of access to AWS resources by managing users, credentials, and permissions. - **Key Management Service (KMS)**: KMS allows users to create and manage encryption keys for data protection. - **Web Application Firewall (WAF)**: WAF protects web applications from common exploits, ensuring availability and security. *Real-World Use Case*: Airbnb uses IAM to manage access to its AWS resources, ensuring only authorized personnel can interact with sensitive data (Intellipaat AWS Use Cases). ## Benefits of Using AWS AWS offers several advantages that make it a preferred choice for organizations: - **Scalability**: AWS allows businesses to scale resources up or down based on demand, ensuring optimal performance without overprovisioning. For example, Netflix scales its EC2 instances to handle peak streaming loads. - **Cost-Efficiency**: By shifting from capital expenses (e.g., purchasing servers) to operational expenses (pay-as-you-go), AWS reduces costs. Users only pay for the resources they consume. - **Global Reach**: AWS’s global network of data centers enables businesses to deploy applications closer to users, reducing latency and improving user experience. - **Innovation**: AWS provides cutting-edge tools, such as machine learning and IoT services, enabling businesses to stay competitive and innovate rapidly. ## Key AWS Services Several AWS services stand out for their versatility and impact: | **Service** | **Description** | **Use Case** | | --- | --- | --- | | **EC2** | Scalable virtual servers for running applications. | Netflix uses EC2 for scalable streaming infrastructure. | | **S3** | Object storage for data with high durability and availability. | Adobe stores creative assets on S3 for global access. | | **RDS** | Managed relational database service for MySQL, PostgreSQL, and more. | Bankinter manages banking data with RDS for performance and scalability. | | **Lambda** | Serverless computing for running code without managing servers. | McDonald’s uses Lambda for real-time order processing with delivery partners. | | **CloudFront** | Content delivery network for low-latency content distribution. | Media companies use CloudFront to deliver videos with minimal delay. | ## Recent Innovations in AWS AWS continues to push the boundaries of cloud computing with innovations in emerging technologies: - **Machine Learning Services**: Amazon SageMaker is a fully managed platform for building, training, and deploying machine learning models. It simplifies the process for developers and data scientists, enabling applications like predictive analytics (AWS SageMaker). - **Generative AI**: Amazon Bedrock supports the development of generative AI applications, such as chatbots and content generation tools, enhancing customer experiences and operational efficiency (AWS Generative AI). - **Quantum Computing**: AWS Braket provides access to quantum computers and simulators, allowing researchers and developers to explore quantum algorithms for complex problems (AWS Braket). These advancements position AWS as a leader in enabling businesses to leverage cutting-edge technologies without requiring extensive in-house expertise. ## Conclusion Amazon Web Services (AWS) is a cornerstone of modern cloud computing, offering a vast array of services that empower organizations to build, deploy, and scale applications efficiently. Its core categories—compute, storage, database, networking, and security—address diverse needs, supported by real-world applications across industries like entertainment, finance, and technology. The benefits of scalability, cost-efficiency, global reach, and innovation make AWS a preferred choice for businesses aiming to thrive in the digital era. With ongoing advancements in machine learning, generative AI, and quantum computing, AWS continues to lead the way in shaping the future of cloud technology.

Nano is a lightweight, user-friendly, and versatile command-line text editor available in most Linux distributions. Known for its simplicity and ease of use, nano is an excellent choice for beginners and experienced users alike who need to edit configuration files, scripts, or text files directly in the terminal. This article provides a comprehensive overview of nano, covering its features, installation, usage, key bindings, configuration, and advanced tips. ## What is Nano? Nano is a free, open-source text editor designed for Unix-like systems, including Linux. It is a clone of the older Pico editor, part of the Pine email client, but it is released under the GNU General Public License, making it widely accessible. Unlike more complex editors like Vim or Emacs, nano prioritizes simplicity, offering an intuitive interface with on-screen keybinding hints, making it ideal for quick edits or users new to the command line. Nano is often pre-installed on many Linux distributions, such as Ubuntu, Debian, Fedora, and CentOS. Its small footprint and minimal dependencies make it a staple in lightweight environments, including servers and embedded systems. ## Key Features of Nano - **User-Friendly Interface**: Displays a clean, distraction-free interface with key commands shown at the bottom of the screen. - **Syntax Highlighting**: Supports syntax highlighting for various programming languages and configuration files. - **Search and Replace**: Allows searching for text and performing replacements, including regular expression support. - **Multi-Buffer Editing**: Enables editing multiple files simultaneously in different buffers. - **Customizable Configuration**: Users can customize nano’s behavior via the `nanorc` configuration file. - **Cross-Platform Compatibility**: Works on Linux, macOS, and other Unix-like systems. - **Low Resource Usage**: Lightweight and fast, suitable for resource-constrained environments. ## Installing Nano Nano is pre-installed on most Linux distributions. To check if nano is installed, run: ```bash nano --version ``` If nano is not installed, you can install it using your distribution’s package manager: - **Debian/Ubuntu**: ```bash sudo apt update sudo apt install nano ``` - **Fedora**: ```bash sudo dnf install nano ``` - **Arch Linux**: ```bash sudo pacman -S nano ``` - **openSUSE**: ```bash sudo zypper install nano ``` For other distributions, consult the package manager documentation or download the source code from the official nano website (`https://www.nano-editor.org/`) and compile it manually. ## Basic Usage To open nano, type `nano` in the terminal, optionally followed by a filename: ```bash nano filename.txt ``` If the file exists, nano opens it for editing. If it doesn’t, nano creates a new file with that name when you save. ### Interface Overview When nano opens, you’ll see: - A title bar at the top showing the filename and nano’s version. - The main editing area where you type or edit text. - A status bar at the bottom displaying messages or prompts. - Two lines of keybinding shortcuts at the bottom, prefixed with `^` (Ctrl) or `M-` (Alt/Meta). ### Common Keybindings Nano uses control (`Ctrl`) and meta (`Alt` or `Esc`) key combinations for commands. Some essential keybindings include: - `Ctrl + O`: Save (write out) the file. - `Ctrl + X`: Exit nano (prompts to save if the file is modified). - `Ctrl + G`: Open the help menu. - `Ctrl + W`: Search for text (whereis). - `Ctrl + \`: Replace text. - `Ctrl + K`: Cut the current line. - `Ctrl + U`: Paste (uncut) the cut text. - `Ctrl + C`: Show the current cursor position. - `Alt + U`: Undo the last action. - `Alt + E`: Redo the last undone action. The bottom of the screen displays these shortcuts, and you can access the full help menu with `Ctrl + G` for a complete list. ## Editing Files ### Opening and Creating Files To edit an existing file or create a new one: ```bash nano /path/to/file ``` If you open nano without a filename (`nano`), you can save to a new file later. ### Saving and Exiting To save changes: 1. Press `Ctrl + O`. 2. Confirm or edit the filename and press `Enter`. 3. To exit, press `Ctrl + X`. If unsaved changes exist, nano prompts you to save. ### Navigating the File - Use arrow keys to move the cursor. - `Ctrl + A`: Jump to the beginning of the line. - `Ctrl + E`: Jump to the end of the line. - `Ctrl + Y`: Scroll up one page. - `Ctrl + V`: Scroll down one page. - `Alt + \`: Go to the first line of the file. - `Alt + /`: Go to the last line of the file. ### Copy, Cut, and Paste Nano handles text manipulation simply: - `Ctrl + K`: Cuts the entire line. - `Ctrl + U`: Pastes the cut text at the cursor position. - To copy without cutting, mark text with `Alt + ^` (set mark), move the cursor to select, then use `Ctrl + K` to copy and `Ctrl + U` to paste. ### Search and Replace To search for text: 1. Press `Ctrl + W`. 2. Enter the search term and press `Enter`. 3. Press `Alt + W` to find the next occurrence. To replace text: 1. Press `Ctrl + \`. 2. Enter the text to find and the replacement text. 3. Choose to replace one instance or all instances. For regular expressions, enable regex mode with `Alt + R` during search or replace. ## Configuring Nano Nano’s behavior can be customized via the `nanorc` configuration file, located globally at `/etc/nanorc` or per-user at `~/.nanorc`. To create or edit a user-specific configuration: ```bash nano ~/.nanorc ``` ### Common Configuration Options Here are some useful settings to add to `~/.nanorc`: ```bash # Enable syntax highlighting set syntaxcolor # Enable line numbers set linenumbers # Enable soft line wrapping set softwrap # Set tab size to 4 spaces set tabsize 4 # Convert tabs to spaces set tabstospaces # Enable auto-indentation set autoindent # Enable mouse support set mouse # Enable smooth scrolling set smooth # Save backups of files set backup ``` ### Syntax Highlighting Nano supports syntax highlighting for various file types (e.g., Python, C, HTML). Syntax definitions are stored in `/usr/share/nano/` or `/usr/local/share/nano/`. To enable highlighting for a specific language, add to `~/.nanorc`: ```bash include "/usr/share/nano/python.nanorc" include "/usr/share/nano/html.nanorc" ``` You can find available syntax files in the nano installation directory or create custom ones. ## Advanced Features ### Multi-Buffer Editing Nano supports editing multiple files in different buffers: - Open additional files with `Ctrl + R` and specify the filename. - Switch between buffers with `Alt + ,` (previous) or `Alt + .` (next). ### Executing Commands Nano can pipe the current buffer through an external command: 1. Press `Ctrl + T`. 2. Enter a command (e.g., `sort` or `fmt`). 3. The output replaces the buffer’s content. ### Spell Checking If a spell checker like `aspell` or `hunspell` is installed, enable spell checking with `Ctrl + T` (or `F12` in some versions) and follow the prompts. ### Custom Keybindings You can redefine keybindings in `~/.nanorc` for advanced customization. Refer to the nano documentation for details on binding commands to specific keys. ## Tips and Tricks - **Set Nano as Default Editor**: Set nano as the default editor for commands like `git commit` or `crontab -e` by adding to your shell configuration (e.g., `~/.bashrc`): ```bash export EDITOR=nano ``` - **Backup Files**: Nano’s `set backup` option creates backup files with a `~` suffix, useful for recovering unsaved changes. - **Read-Only Mode**: Open a file in read-only mode with: ```bash nano -v filename ``` - **Line Numbers for Specific Commands**: Jump to a specific line with: ```bash nano +LINE_NUMBER filename ``` - **Custom Syntax Highlighting**: Create custom syntax files for specific file types by studying existing `.nanorc` files in `/usr/share/nano/`. ## Troubleshooting - **Missing Syntax Highlighting**: Ensure the relevant `.nanorc` files are included in `~/.nanorc` or `/etc/nanorc`. - **Keybindings Not Working**: Check for conflicts in `~/.nanorc` or ensure your terminal supports the required key combinations. - **Permission Issues**: If you can’t save a file, check permissions with `ls -l` and use `sudo nano` for system files. ## Conclusion Nano is a powerful yet approachable text editor that strikes a balance between simplicity and functionality. Its intuitive interface, customizable options, and lightweight design make it an excellent choice for editing files on Linux systems. Whether you’re tweaking configuration files, writing scripts, or taking notes, nano provides a straightforward and efficient editing experience. By mastering its keybindings and configuration options, you can tailor nano to suit your workflow, making it a valuable tool in your Linux toolkit. For more information, visit the official nano website (`https://www.nano-editor.org/`) or explore the help menu (`Ctrl + G`) within nano.